Double-Layer Car Ceiling Cargo Net Hammock Organizer
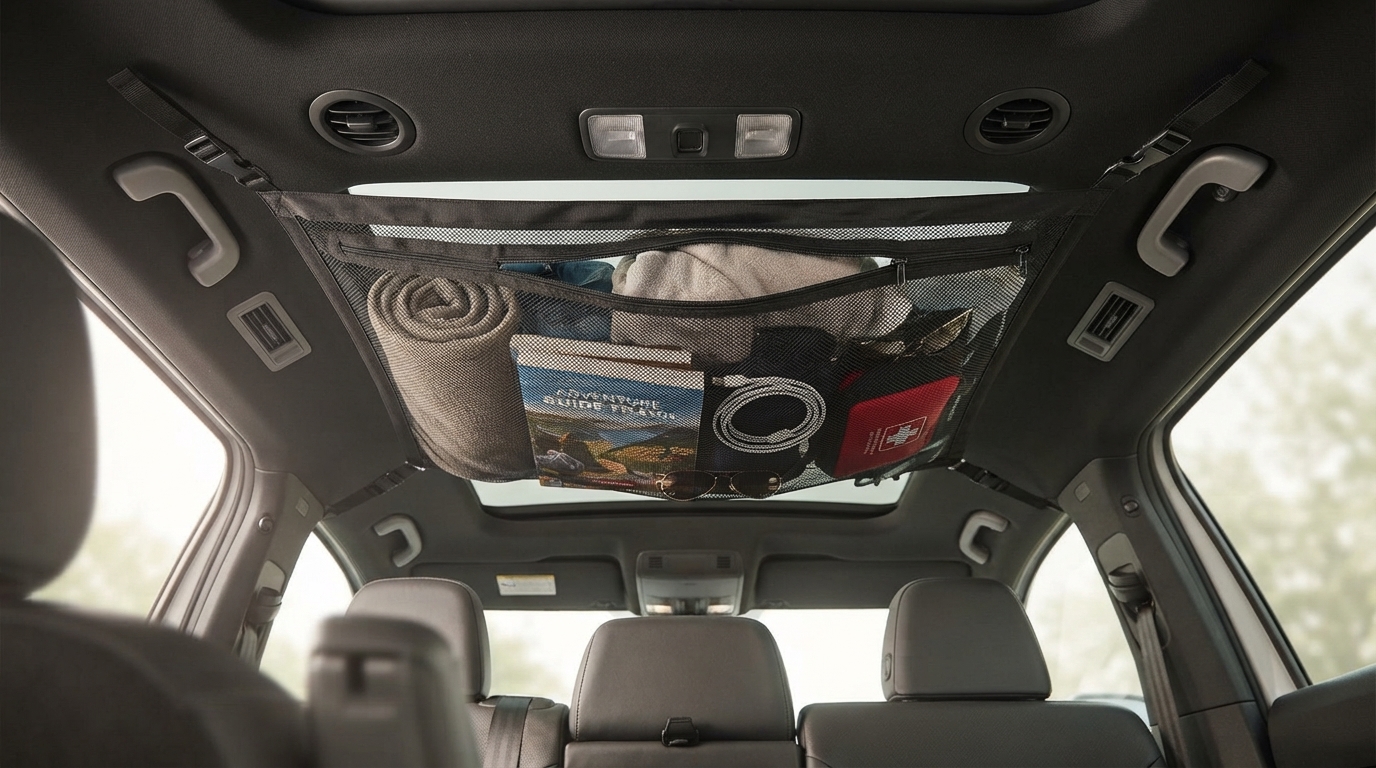
Car Ceiling Cargo Net Double-Layer Roof Organizer Hammock with Compartments
A ceiling-mounted cargo net can turn unused headliner space into a tidy storage zone for soft, lightweight essentials—keeping seats and footwells clearer on commutes, road trips, and daily errands. This double-layer organizer hammock adds compartments to help separate items so they’re easier to find and less likely to slide around.
What It Is and When It Helps Most
A car ceiling cargo net organizer is a “hammock” style storage net that mounts above the rear seats, using overhead attachment points to hold soft gear off the floor and out of the trunk. The double-layer design is intended to separate flatter items (like maps, towels, or light jackets) from smaller grab-and-go pieces (like chargers, tissues, or wipes), so the cabin stays calmer and more predictable.
This kind of overhead storage is especially handy for families, rideshare drivers, and anyone who wants quick-access organization without adding a bulky console organizer. It’s also a smart way to keep commonly used soft items within reach while leaving the trunk for heavier luggage. For best results, treat it as a light-to-moderate load solution—ideal for compressible items rather than hard, heavy objects.
Design Highlights: Double Layer + Compartments
The key benefit of a double-layer roof organizer is separation. Instead of one big pocket where everything settles into a lump, the two-layer netting creates distinct zones:
- Top layer for flatter items: Great for items that lay evenly and help the net keep its shape—think microfiber towels, a thin blanket, or a folded rain jacket.
- Lower layer for bulkier soft goods: Items like travel pillows or rolled blankets can sit cradled rather than perched on a seat.
- Compartment-style sections: Helpful for separating frequently used categories (cleaning cloths vs. kids’ snacks vs. travel tissues) so you’re not digging while parked.
- Less shifting than loose seat storage: The net structure is meant to reduce sliding during braking and turning compared to items laid on the seats.
Ceiling placement also keeps gear visible at a glance, which can reduce time spent searching through trunk bags at gas stops or pickup lines.
Fit and Compatibility Checklist
Before choosing an overhead cargo net, a quick compatibility check can save frustration during installation:
- Look for secure mounting points: Many vehicles have grab handles, hooks, or suitable anchor points above the rear seating area.
- Confirm headroom and passenger comfort: The organizer should sit high enough that it doesn’t crowd rear passengers or obstruct their view.
- Match to your vehicle type: SUVs and crossovers often have easier overhead attachment options; some sedans may have fewer suitable points.
- Stay clear of side-curtain airbags: Avoid routing straps or placing cargo where airbags deploy. For general guidance, see NHTSA air bag information.
- Sunroof/panoramic roof owners: Make sure the net won’t block operation or rub on glass and tracks.
As with any in-cabin storage, prioritize safe riding habits and secured items; the CDC’s motor vehicle safety guidance offers helpful context on safer travel practices.
Installation and Setup (Practical Steps)
Most ceiling cargo nets install quickly, but a little method beats constant readjusting later:
- Start empty: Locate four stable attachment points before tightening anything.
- Center it: Align the organizer so weight distributes evenly left-to-right; uneven tension is a common cause of sagging.
- Tighten gradually: Secure the front pair first, then the rear pair, then re-check alignment and tension.
- Load with intent: Put flatter, lighter items on the upper layer. Keep heavier soft items closer to the center of the net to reduce sway.
- Test drive and fine-tune: Take a short drive and adjust strap tension so items stay contained without drooping into the cabin.
Quick Reference: Use, Load, and Placement
Overhead nets work best when used for the right kinds of items and packed with visibility in mind.
| Goal | Best Items | Placement Tip |
|---|---|---|
| Keep the cabin floor clear | Jackets, blankets, towels | Lay flat across the upper layer to reduce sag |
| Organize small essentials | Tissues, wipes, small chargers, snacks | Use compartment areas and group by category |
| Stabilize during driving | Soft, compressible items | Keep heavier soft items centered and evenly distributed |
| Maintain visibility | Low-profile items | Avoid stacking high; don’t block mirror sightlines |
Good choices: jackets, blankets, microfiber towels, travel pillows, spare diapers, paper towels, small soft bags.
Care, Safety, and Long-Term Use
Pairing Ideas for Road Trips and Pet-Friendly Travel
Recommended In-Stock Picks
- Car Ceiling Cargo Net Double-Layer Roof Organizer Hammock with Compartments (In stock) — a ceiling-mounted, compartment-style option for organizing soft essentials overhead.
- Stress-Free Pet Adventures – A Complete Pet Travel Guide for Calm, Happy Trips | Digital Download eBook for Dogs & Cats (In stock) — helpful planning tips for calmer pet-friendly drives and routines.
FAQ
Will a ceiling cargo net fit most cars and SUVs?
Fit depends on having suitable overhead anchor points (like grab handles or hooks), enough headroom, and an install location that stays clear of airbag zones. Measure the mounting area and confirm the straps can reach and tighten evenly before purchase.
What should not be stored in a roof organizer hammock?
Avoid heavy, rigid, sharp, or breakable items, and don’t place anything that could become a projectile during braking. Also keep the organizer low-profile so it doesn’t block rearview visibility.
How do you stop the net from sagging or swaying while driving?
Tighten straps evenly, center the organizer, and distribute weight symmetrically. Keep flatter items on top and heavier soft items centered, then do a short test drive and re-tension as needed.










Leave a comment