Vintage Train Book Nook Kit: DIY Wooden 3D Bookend
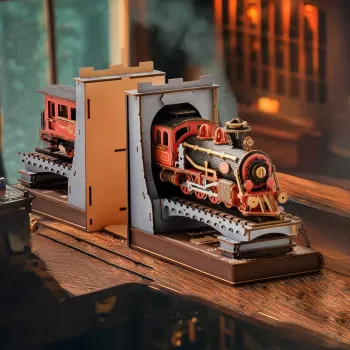
Vintage Wooden Train DIY Book Nook Kit: A 3D Puzzle Bookend for Adults & Teens
A vintage train-themed book nook blends model building, miniature décor, and a functional bookend into one compact, display-worthy project. The result is a “peek-through” diorama that makes a shelf feel curated—without needing a full-size model train setup or a dedicated craft room. Below is a practical guide to what this kit is, what the build process feels like, where it looks best, and how to keep the finished piece clean and sturdy for the long run.
What This Vintage Train Book Nook Is
Think of a book nook as a miniature scene built to live right on your bookshelf. This vintage train version is a wooden 3D puzzle that assembles into a train-inspired interior, designed to sit between books like a decorative bookend. Instead of simply decorating the outside of a shelf, it creates depth—like a tiny station vignette tucked behind your book spines.
It’s made for adults and teens who enjoy hands-on crafts, model kits, and nostalgic shelf décor. The diorama effect becomes an instant conversation piece, especially on busy shelves where a normal figurine would disappear. And because it’s compact, it’s a satisfying project for builders who prefer a contained, weekend-sized display over a large-scale model.
Who It’s Best For (And When It Might Not Be)
This style of kit shines for detail-oriented builders. If careful assembly, small parts, and a steady pace sound relaxing, you’ll likely enjoy the process. It also suits book lovers who want a themed accent between novels, manga, or collectible editions—something that feels personal without overwhelming the shelf.
On the other hand, miniature kits aren’t ideal for anyone who prefers “instant results.” Even when parts fit well, the best-looking builds come from patience, tidy glue work, and letting pieces set before moving on. In households with young children or curious pets, plan a safe drying and assembly area so parts don’t vanish and freshly glued panels don’t get bumped out of alignment.
Build Experience: Time, Tools, and Setup
A smooth build starts with the workspace. Choose a clear, well-lit surface and consider using a tray or shallow box lid to keep tiny components from rolling away. Good lighting is more than comfort—being able to see edges clearly helps keep walls square and seams clean.
Helpful tools to keep nearby:
- Fine-tip tweezers for placing small details
- A precision craft knife for trimming tabs or cleaning small burrs
- Small clamps or clips to hold panels while glue cures
- A ruler for quick alignment checks
For adhesive, the winning strategy is “less, then set.” Use small amounts so glue doesn’t squeeze out onto visible surfaces, and allow curing time so structural panels stay straight. A simple pace tip: dry-fit pieces before gluing. Dry-fitting confirms orientation and reduces rework—especially on layered sections where reversing a panel can throw off the depth effect.
For a more finished look, lightly sand rough edges or fuzzy cut lines before final assembly. That extra minute per section often makes the end result look more “store-bought” and less like a craft project.
Design Details That Make It Look “Vintage”
The “vintage” feel comes from classic train motifs and station-like architectural cues—layers, frames, and warm wood tones that suggest an older era without needing bright paint. The layered panels create shadow and depth, which makes the scene feel larger than it is.
Because it’s a framed diorama, it naturally looks photogenic on a desk, side table, or reading nook shelf. It also pairs especially well with classics, historical fiction, travel books, or rail-themed collections, where the nostalgic mood feels intentional rather than random décor.
If you’re curious why small scenes are so compelling in the first place, miniatures have a long-standing pull on attention and imagination. Sources like Smithsonian Magazine and collecting-focused institutions such as The Strong National Museum of Play explore how miniature worlds and objects become meaningful display pieces over time.
Where to Display It for Maximum Impact
Care, Durability, and Long-Term Upkeep
Quick Reference: What to Expect From the Kit
| Feature | What It Means in Practice | Helpful Tip |
|---|---|---|
| 3D wooden puzzle assembly | Pieces fit together to form a structured miniature scene | Dry-fit before glue to confirm orientation |
| Book nook bookend format | Designed to sit between books and visually “open” into a scene | Place at eye level for best viewing |
| Detail-focused build | Small parts and layered panels create depth | Use tweezers and keep parts in a tray |
| Display décor | Adds a vintage accent to shelves and desks | Avoid direct sun and humidity for longevity |
Product Spotlight: Vintage Wooden Train DIY Book Nook Kit
If you want a train-themed nook that reads as both décor and a satisfying build, the Vintage Wooden Train DIY Book Nook Kit – 3D Puzzle Bookend for Adults & Teens is a strong pick. It’s ideal as a weekend craft project or a slower, relaxing build for evenings when you’d rather work with your hands than scroll.
It also makes a thoughtful gift: it arrives as a kit, but the finished display piece feels personal once assembled. For an extra cozy pairing, add a low-effort digital read for downtime between build sessions, such as The Midday Energy Crash Mystery – Post-Meal Fatigue Guide, Digestion & Energy Balance eBook.
FAQ
Are vintage trains worth anything?
They can be, but value depends on the maker, rarity, condition, and provenance. A vintage-inspired DIY book nook is typically valued as a craft and display piece rather than a historical collectible like an authentic vintage model train.











Leave a comment